| Creating a Sliding Wood Patch Box |
By Jerry Crawford,
Alfred, Maine
I’m a novice at gun building. This is my very first scratch build gun, if you don’t count the still unfinished gun I used as a class room learning tool at my masters shop a few years ago. Now working on my own at my home in Maine I have occasionally been daunted by some of the small steps necessary to put together one of these beautiful guns. Luckily I can get on the internet now and ask questions here on the American Longrifle web site and from friends around the country who are masters at this hobby. I wanted to share my learning curve with you about one of the mysteries of gun building; the sliding wood patch box lid. This article describes my progress in photographs and text.
Along the way you will notice some methods-of-work tactics that may seem unusual for gun makers but are fairly common place to cabinet makers or home grown woodworkers such as myself. The use of the Dremmel as a router is an example. Not only is it a time saver in the hands of an experienced user, but in the case of this wood in this particular gun stock the router made short work of the knarly grain which is hard as rock and very prone to splintering or chipping. For the same reason I also have a box full of “special” files that I have bent to conform to special shapes or fabricated into floats for molding, and a few bottoming chisels I learned I needed to inlet locks. There is a down side here however; in inexperienced hands the Dremel can be very destructive. In an instant it can ruin a piece of wood or a gun stock. And, you spend a lot of time creating different shaped chisels or file floats you might not use again.
I suggest before you begin to make a sliding patch box lid read everything you can get your hands on about it. That will begin to give you an intellectual foundation for the task and it is how I learn best. An especially good publication that has become my shop companion and bible is The Gunsmith of Grenville County, by Peter Alexander, published and available from Scurlock Publishing Company from whom many of us subscribe to Muzzleloader Magazine. Much of what I’ve learned about this topic I adapted from reading chapter 27. I selected a two piece lid construction because it made sense to me as a woodworker and Alexander remarked they were commonly done that way. I understand there is some grey area here as some feel the two-piece technique was more common on German guns than American and probably some will consider the two piece lid somehow inferior to a one piece. That can’t be helped.
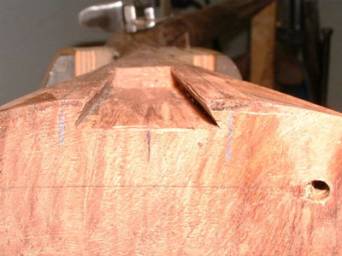
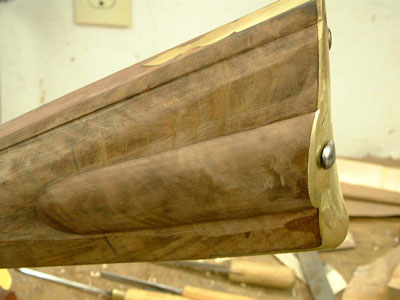
1. Decide the size, shape and location of the lid and lay out the pattern on the stock. The area must be absolutely flat where you will inlay the lid. You can see here the general outline of the flat area and the contours of the lid’s final shape. Within that area mark where the box will be and lay out the tapered shape for the dovetail mortise. I know a gunmaker who makes his box rectilinear, that is parallel sided – and he is a master maker so I can’t criticize his work. But in my opinion if I were to follow that design my lid would swell and stick in place or be so loose it would rattle around and drop off. Since I’m laying this out by hand I thought to do it ala Alexander. During planning I milled out the ¼” thick maple dovetail key you can see being fitted further below. I used a section of it as a gage for the depth of the initial mortise.

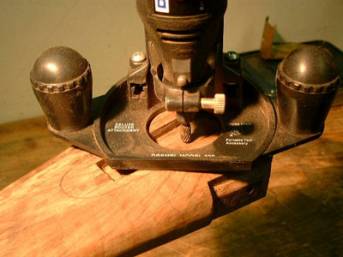
After marking out the lines of the cavity-to-be with knife and chisel I did the excavating with my Dremmel router in 1/32 - 1/16” steps, going back in with chisels to clean up the inside corners of the box after each layer had been removed. Taking shallow passes like this was more time consuming but I was more concerned with controlling the router than speed of excavation. Here, on the surface of the stock, is where a router mistake would have been a disaster.
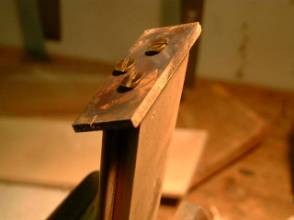
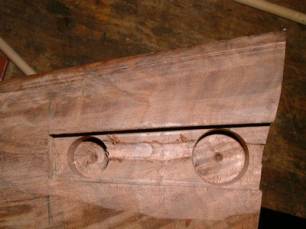
2. Once I had the mortise in I reinstalled the butt plate and began to shape the cut out on it. I sliced several slots with a hack saw then filed the opening square to the mortise in the wood.
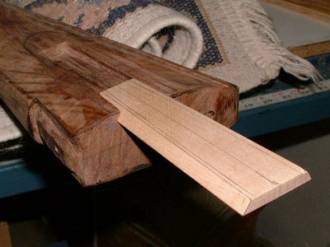
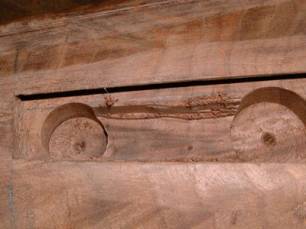
3. Once everything was square and clean, I made a special file for cutting in the dovetail ways. I bought a Nicholson 3-square 2d cut file for this. I don’t know how important this is, but I modified the file by cutting off the top three inches or so right where the sides begin to taper toward the tip and then ground off (safeing) one face. I used the large 3-square because its sides are a perfect 60 degrees and that makes a great, easily repeatable dovetail. I began the dovetail by chopping into the mortise side with chisels just to get rid of most of the wood. Then I went at it with the file, safe face down on the floor of the mortise. Most of the shaping of the way in the wood and butt plate was accomplished using this file.
In the photograph at the right you can see the result of using the 3-square: nice clean identical ways ready for fitting in the maple key. Note the slightly blunt shape of the edges of the way. From a woodworking perspective this is desirable and helps prevent splitting or chipping off of these edges. With this particular piece of wood this was an important consideration.
4. The key was cut out using the same pattern as the initial layout. I scribed several witness lines on the face and on the ends of the key. These were very helpful keeping the 60 degree bevel true to the tapered shape of the mortise. The key is also over long. The extra gave me something to grab while planing off the bevel on each edge and allowed for some trimming on the narrow end so I could snugly bottom out against the stock. For me, the easiest way to do the 60 degree bevel edges on the tapered key was to park my finish hand plane upside down in my vise and use it as a sort of mini-jointer skating the wood over the blade taking very thin cuts while holding the key at the correct angle to maintain the bevel.
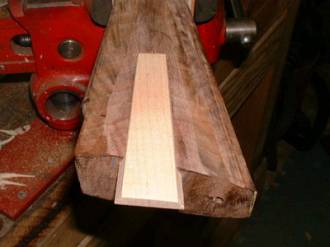
By making the key progressively narrower I was able to achieve a fit that bottomed out exactly where I wanted it to. You will note that the key is slightly over thick of the mortise. I applied my cabinet scraper and reduced it a few “thou” before I glued on the walnut lid top. After the key is fit in place I reinstalled the butt plate and filed a matching dovetail so the key fit without interference on the brass.
5. I used pencil alignment lines everywhere to try and assure a good fit. This wasn’t always perfect but it worked. I placed the lid over the key and put the marks in place. Then pull out the key and glued the two together overnight with a two part epoxy. Ordinary wood glue would have probably worked as well. The next morning I took off the clamps and slid the lid in place for the first time – a perfect snug fit – hit the witness lines cleanly.
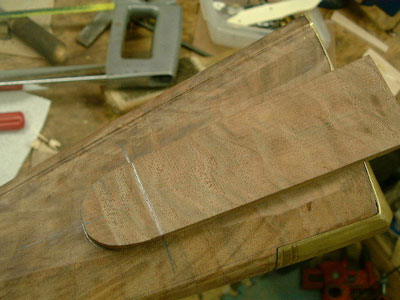
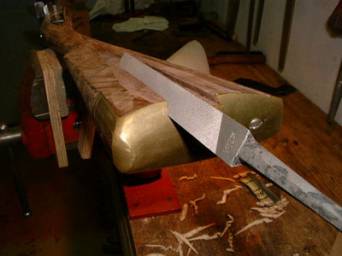
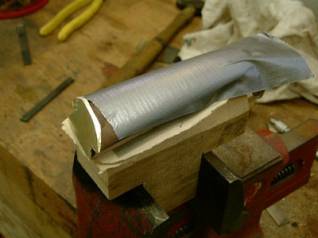
6. Since the lid is tapered, with clean sharp edges on the key I didn’t want to bugger up, it could have been pretty difficult to hold securely for shaping. My solution was one I’ve used in woodworking for years. I glue it to another block of wood I can hold in the vise! The trick is to place one or two layers of news print between the two wood parts. You need not be overly generous with the glue - just a smear on both surfaces is OK. Clamp it off and let it dry over night.
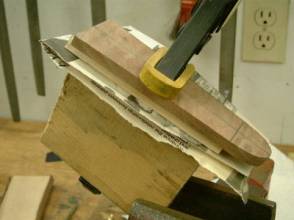
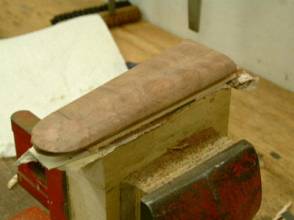
Now, you can hold the lid in a vise and put the shape you want on it. To separate the lid from the block simply part them with a sharp chisel at the paper seam. There will be some paper stuck to the underside of the lid but that can be easily cleaned off by dampening it and scraping.
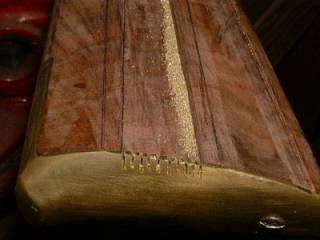
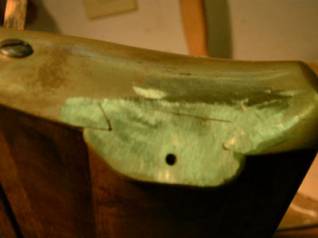
7. Now that the lid shaping is about finished it’s time to trim the lid and install the brass toe plate. I followed Alexander’s suggestion and used a ⅛” thick piece of annealed brass held in place with epoxy and three brass screws. The screws are a matter of choice. Some people swear by small brass nails; others use steel screws. I don’t suppose any of them are incorrect unless you are replicating a particular style or maker who “always” uses one method. I didn’t have any #4 X ½” wood screws so I used #6’s. They worked but are really too fat and I could have been more careful where I located them – the two on the bottom edge wound up poking through the wood on the bottom of the key. Not a tragedy but sloppy and noticeable.
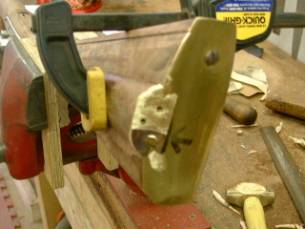
It’s tedious but you have to cut away the brass around the lid in small steps to fit it in the dovetail on the butt plate. If you used epoxy to help hold the trim piece on the lid as I did, be careful filing because the heat generated from filing on the brass will cause the epoxy to fail and the brass will part from the lid. Following Peter Alexander’s information I filed down the lid to fit the butt plate and eventually got a pretty good insert.
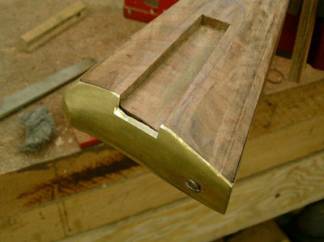
Next is to finish profiling the brass edge around the lid. To do this I glued the lid back onto a vise block and put a piece of tape over it to protect the surface from the file as I went at the brass.
Return and fit the lid into the dovetail. Continuing to file and fit it eventually comes together. By swapping the screws around you can shape down all the surface of the brass to match the butt plate contour. Once the profile is correct pull the screws one last time, counter sink slightly for the screw heads, and then file them off flush with the surface. Be warned: the screws will seem longer after you face off the brass plate and countersink for the heads. The points may poke through the bottom surface of the key if you don’t plan ahead. Once the screw (or nail) heads are filed off they almost disappear.
7. Forging and fitting the spring clip to hold the lid in place is the final step. I pretty much followed the guidance in Alexander except I used ordinary cold rolled mild steel rather than the spring steel he recommends. My forge is an Oxy/Acet torch held in my gun vise and my anvil is a section of rail road rail parked upside down in my bench vise.
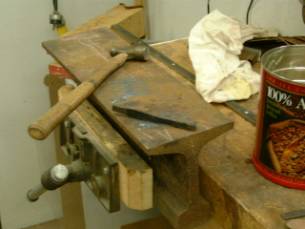
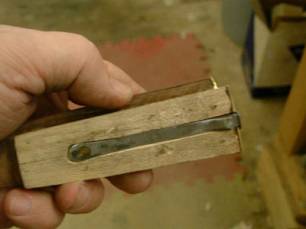
Since this was the first time I’ve made the clip it took me three hours and two tries to make one that worked. I’m sure there are a handful of blacksmithing tips a more experienced gun maker would know to do a more expedient job. After some fiddling and adjusting, and lots of filing and fitting, the spring went in to its mortise in the back of the lid and works very well. Don’t tighten the small screw too hard. You are going to be removing/replacing it many times during this fit and try process. Eventually the wood and/or the screw slot will wear out and give you another problem you don’t need.
At last I have a good fit and function. I still have to polish out the file marks and profile the thumb tab but the mechanics of building the lid are finished. Only thing left to do is excavating the box.
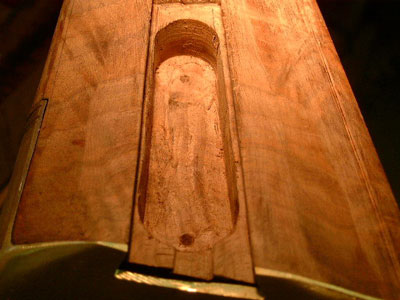
8. Excavating the box under the lid was straight forward wood removal. I drew a couple of side lines and using Forstner bits blocked out the ends to an even depth of about 5/8” below the dovetail.
Using the Dremmel router just as I did above I began cleaning out between the two holes taking very shallow passes again until I was at the right depth. I finished by squaring the shoulders and bottom with chisels.
It is very helpful for me to brainstorm something like this for quite a while before I actually start removing wood. I game it over and over in my head trying to rehearse the steps and the order things will happen as well as trying to imagine anything I may need on hand (such as a 3-square file). And, as in this case, I enhance the experience and reinforce my own learning by helping to teach someone else what I just learned.
This article is Copyright 2002 by Jerry Crawford and is published with the permission of the author .
| American Longrifles Home | Back | Gun Building Home |
This page was last updated on 04/01/05 .
Copyright 2002-2005 by AAAV, LLC